Battery switch on travel trailer function is crucial for managing your RV’s power. Understanding how to use your battery switch safely and effectively is key to enjoying hassle-free camping. This guide covers various switch types, connection procedures, troubleshooting, and maintenance, ensuring you’re prepared for any situation on the road.
We’ll explore the different types of battery switches (single, dual, selector), providing step-by-step instructions for operation and highlighting essential safety precautions. Learn how to connect and disconnect batteries correctly, preventing corrosion and ensuring optimal performance. We’ll also tackle common problems, offering troubleshooting tips and a handy flowchart to guide you through repairs.
Understanding Battery Switch Functionality in Travel Trailers
Your travel trailer’s battery switch is a crucial component for managing power and preventing battery drain. It allows you to disconnect your house batteries from the trailer’s electrical system, protecting them from depletion when the trailer isn’t in use and enabling you to choose which battery bank powers your appliances. Understanding how it works is key to maintaining your trailer’s electrical system and extending the life of your batteries.
Battery Switch Purposes
The primary purpose of a battery switch in a travel trailer is to isolate the house batteries from the rest of the electrical system. This prevents parasitic drain, which occurs when small amounts of current are drawn from the batteries even when the trailer isn’t being used, eventually leading to a dead battery. A secondary purpose is to select which battery bank (if you have more than one) supplies power to the trailer.
This is particularly useful for managing charge and discharge cycles when using solar panels or a generator to charge the batteries.
Types of Battery Switches
Travel trailers utilize several types of battery switches. A single battery switch is the simplest, offering an on/off function for a single battery bank. Dual battery switches manage two separate battery banks, allowing independent control of each. Selector switches offer more control, typically allowing for the selection of “Both,” “Battery 1,” “Battery 2,” and “Off” positions, providing flexibility in managing power sources.
Some more advanced systems integrate with battery monitors to provide more detailed information and control.
Operating a Battery Switch
Proper operation of your battery switch is straightforward but essential. First, locate the switch; it’s usually found near the battery compartment or inside a convenient access panel. Next, carefully identify the switch positions (typically labeled). To disconnect the batteries completely, turn the switch to the “Off” position. To connect a specific battery bank (in dual or selector switches), choose the corresponding position.
When connecting both banks, select the “Both” position (if available). Always ensure the switch is securely in the desired position.
So, you’re an audiophile who loves to travel? Awesome! Make sure you check out this guide on creating the perfect audiophile travel setup before you go. It’ll help you keep your tunes sounding amazing on the road. And while you’re planning, don’t forget travel insurance! Getting Aon travel insurance is a smart move to protect your gear and yourself during your adventures.
Having both sorted out will make your trip much smoother and more enjoyable.
Battery Switch Safety Precautions
Working with batteries involves potential hazards. Always disconnect the battery switch before performing any maintenance on the electrical system to prevent accidental shocks. Ensure the area is well-ventilated when working near batteries, as they produce hydrogen gas during charging, which is highly flammable. Wear appropriate safety gear, such as gloves and eye protection, when handling batteries or working near the battery switch.
Never attempt to force the switch; if it doesn’t turn easily, investigate the cause before proceeding. Consult your trailer’s manual for specific safety instructions related to your model and battery switch type.
Connecting and Disconnecting Batteries
Connecting and disconnecting your travel trailer batteries to the battery switch is a straightforward process, but it’s crucial to do it correctly to avoid damage to your batteries and electrical system. This section will guide you through the steps, emphasizing safety and best practices. Remember, always disconnect from the power source before working on any electrical connections.Connecting and disconnecting your batteries involves working with potentially dangerous electrical components.
Always prioritize safety. Improper connections can lead to sparks, short circuits, and even battery explosions.
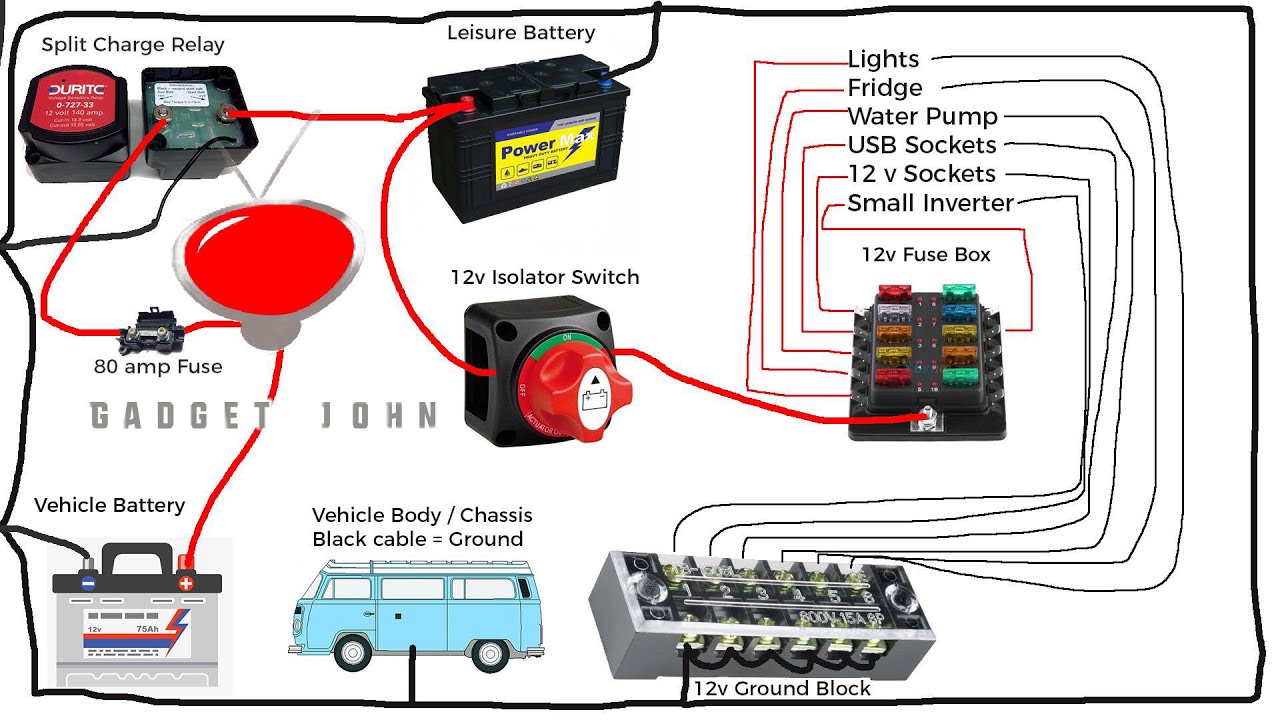
Battery Connection Points
The following table details the typical connection points for a battery switch in a travel trailer. Note that the specific wire colors and connection points may vary slightly depending on your trailer’s wiring and the type of battery switch installed. Always consult your trailer’s wiring diagram if you have any questions.
| Component | Wire Color | Connection Point | Notes |
|---|---|---|---|
| Positive (+) Battery Terminal (Battery 1) | Typically Red | Large positive terminal stud on battery 1 | Ensure a clean and tight connection. |
| Positive (+) Battery Terminal (Battery 2) | Typically Red | Large positive terminal stud on battery 2 | If using a dual battery setup. |
| Negative (-) Battery Terminal (Battery 1) | Typically Black | Large negative terminal stud on battery 1 | Ground connection for battery 1. |
| Negative (-) Battery Terminal (Battery 2) | Typically Black | Large negative terminal stud on battery 2 | Ground connection for battery 2 (if applicable). |
| Positive (+) Switch Input | Typically Red | Positive (+) terminal on the battery switch | Connects to the positive terminals of the batteries. |
| Negative (-) Switch Input | Typically Black | Negative (-) terminal on the battery switch | Connects to the negative terminals of the batteries. |
| Positive (+) Output to Trailer | Typically Red | Positive (+) output terminal on the battery switch | Power to the trailer’s 12V system. |
| Negative (-) Output to Trailer | Typically Black | Negative (-) output terminal on the battery switch | Ground for the trailer’s 12V system. |
Maintaining Battery Connections
Properly maintaining your battery connections is essential for preventing corrosion and ensuring optimal conductivity. Corrosion buildup on the terminals can significantly reduce the flow of electricity, leading to poor performance and potentially damaging your batteries.To prevent corrosion, clean the battery terminals regularly using a wire brush or terminal cleaner. Apply a thin layer of dielectric grease to the terminals after cleaning to prevent future corrosion.
Make sure all connections are tight and secure. Loose connections can cause overheating and damage. Regularly inspect the connections for any signs of corrosion or looseness.
So, you’re an audiophile who loves to travel? Awesome! Check out this guide on creating the perfect audiophile travel setup before you go. It’s crucial to protect your gear, and while you’re planning, don’t forget travel insurance! Getting Aon travel insurance will give you peace of mind knowing your expensive headphones are covered in case of loss or damage.
Enjoy your travels and your amazing sound!
Identifying Positive and Negative Terminals
Correctly identifying the positive (+) and negative (-) terminals on your batteries and battery switch is critical. Connecting the positive and negative terminals incorrectly can cause a short circuit, potentially leading to sparks, damage to your electrical system, and even a battery explosion.Battery terminals are usually clearly marked with a “+” symbol for positive and a “-” symbol for negative.
The positive terminal is typically larger than the negative terminal. If the markings are unclear or worn, consult your battery’s manual or a qualified technician for assistance. Double-check all connections before turning on any power.
Troubleshooting Common Battery Switch Issues
Dealing with a faulty battery switch in your travel trailer can be frustrating, leaving you without power when you need it most. Understanding the common problems and how to troubleshoot them can save you time, money, and a lot of aggravation. This section will guide you through diagnosing and fixing typical battery switch issues.
Battery switch problems usually manifest as a complete lack of power, flickering lights, or inconsistent power to certain appliances. Other signs include blown fuses, a constantly tripped circuit breaker, or the battery switch itself feeling unusually hot to the touch. These issues can stem from several sources, from simple user error to more complex electrical problems.
Identifying Common Battery Switch Problems
Common problems with travel trailer battery switches often fall into a few categories: issues with the switch itself, problems with the wiring, or issues with the batteries or associated fuses and circuit breakers. A thorough diagnostic process will help pinpoint the exact cause.
Troubleshooting Flowchart
This flowchart provides a systematic approach to diagnosing your battery switch problems. Follow the steps in order to quickly identify and resolve the issue.
- Check the Battery Switch Position: Ensure the switch is correctly set to the desired position (e.g., battery to battery, battery to shore power, or off). Many issues are caused by simple user error.
- Inspect Fuses and Circuit Breakers: Examine all fuses and circuit breakers connected to the battery system. Look for blown fuses (broken filaments) or tripped circuit breakers (switched to the “off” position).
- Check Battery Connections: Inspect the connections between the batteries and the battery switch. Look for loose, corroded, or damaged connections. Clean any corrosion with a wire brush and tighten loose connections.
- Test Battery Voltage: Use a multimeter to check the voltage of each battery. A low voltage reading indicates a weak or dead battery.
- Examine Wiring for Damage: Carefully inspect all wiring connected to the battery switch and batteries for any signs of damage, such as fraying, cuts, or exposed wires.
- Test the Battery Switch Itself: If all other checks are satisfactory, the battery switch itself may be faulty. This typically requires replacing the switch.
A common mistake is leaving the switch in the “off” position or accidentally switching it to the wrong setting. Double-check this first!
Replace any blown fuses with fuses of the correct amperage rating. Reset any tripped circuit breakers. If fuses keep blowing or circuit breakers keep tripping, there may be a short circuit somewhere in the wiring.
Corrosion can significantly impede current flow, leading to power loss. Make sure all connections are clean, tight, and secure.
If the voltage is significantly low (below 12V for a 12V system), the battery needs to be charged or replaced.
Damaged wiring can create short circuits or open circuits, preventing proper power flow. Repair or replace any damaged wiring.
A multimeter can be used to test the continuity of the switch, but this often requires some electrical knowledge. If unsure, it’s best to consult a professional.
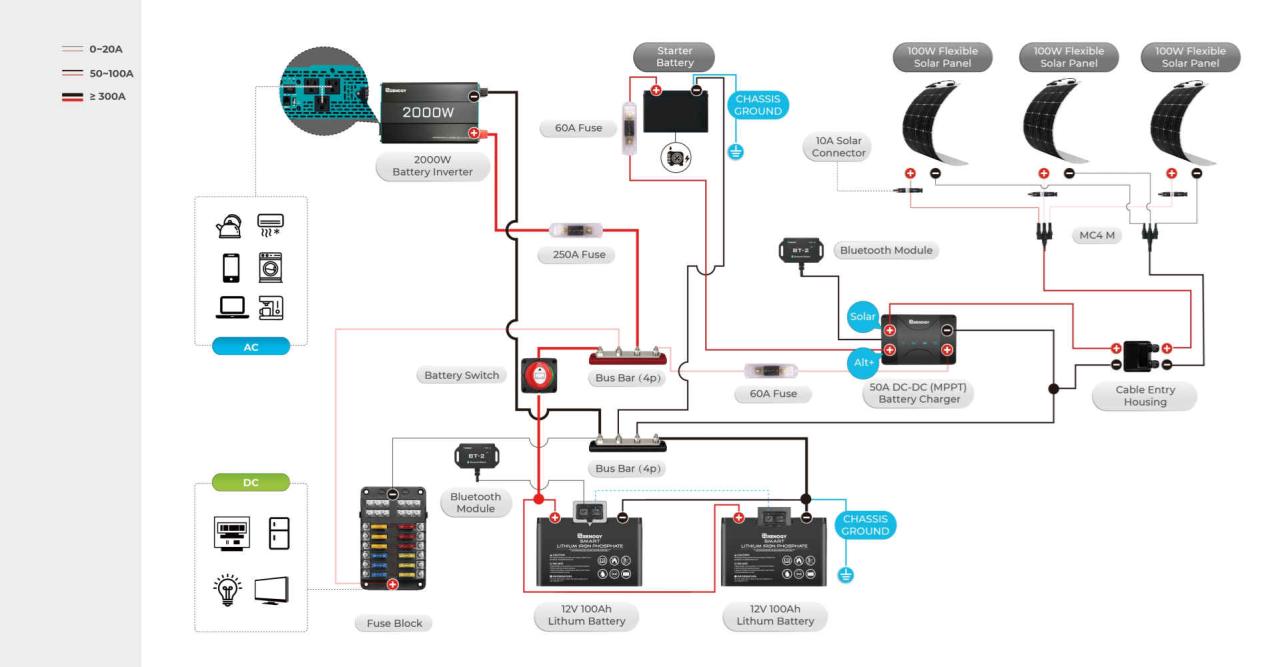
Battery Switch and Electrical System Integration
Your battery switch isn’t just a simple on/off switch; it’s the central nervous system of your travel trailer’s electrical heart. It dictates how power flows between your house batteries, the shore power connection, and all the various electrical components within your RV. Understanding this integration is key to avoiding electrical issues and maximizing your off-grid capabilities.The battery switch’s role varies depending on your trailer’s setup.
It acts as a gatekeeper, determining which power source feeds your appliances and systems. For instance, with the switch in the “battery” position, your appliances run solely on your house batteries. Switching to “off” isolates the batteries for safety, preventing accidental discharge. The “shore power” position allows your converter to charge the batteries while simultaneously powering your RV from the campground’s electrical hookup.
Some switches even offer a “both” position, allowing you to simultaneously draw power from both the batteries and shore power.
Different Battery Switch Configurations and Their Impact
The functionality of your battery switch significantly changes depending on the overall electrical system design of your travel trailer. A simple system might only involve a single battery switch controlling the flow of power to the 12V system and a converter that charges the battery from shore power. More complex systems might include multiple battery banks, an inverter for AC power from DC batteries, and sophisticated charging systems.
These systems may even utilize more advanced battery switches with multiple positions or additional safety features. For example, a system with solar panels will require a charge controller to regulate the power from the panels, which will then feed the battery bank controlled by the battery switch. This complex interaction highlights the importance of understanding your specific system.
Travel Trailer Electrical System Components, Battery switch on travel trailer function
Understanding the interconnectedness of your trailer’s electrical components is crucial for effective troubleshooting and safe operation. Here’s a typical arrangement:
- Shore Power Inlet: The point where you connect your RV to campground electricity.
- Converter/Charger: This device transforms the 120V AC shore power into 12V DC to power your 12V appliances and charge your batteries. It also converts 12V DC to 120V AC for some appliances.
- Battery Switch: Controls the flow of power from your batteries to the 12V system.
- House Batteries: Provide power when off-grid.
- Inverter: Converts 12V DC from your batteries into 120V AC to run higher-power AC appliances while off-grid.
- 12V Appliances: Lights, water pump, and other devices directly powered by 12V DC.
- 120V Appliances: Air conditioner, microwave, and other devices requiring 120V AC power.
- Fuse Panel/Circuit Breakers: Protect the wiring and appliances from overloads and short circuits.
- Solar Panel (Optional): Provides supplemental charging for your house batteries.
- Charge Controller (Optional): Regulates the power from solar panels to prevent overcharging your batteries.
Maintaining and Replacing a Battery Switch: Battery Switch On Travel Trailer Function
Keeping your travel trailer’s battery switch in top condition is crucial for reliable power. Regular maintenance prevents unexpected breakdowns and extends the lifespan of your switch, saving you time and money in the long run. Neglecting maintenance can lead to corrosion, poor connections, and ultimately, failure of the switch.
Inspecting and Maintaining a Battery Switch
Regular inspection is key to preventing problems. Start by visually checking the switch for any signs of corrosion, loose connections, or physical damage. Look closely at the terminals for any buildup of white or green powdery substance (corrosion). Check the switch’s mounting for any looseness or damage. If you notice any corrosion, carefully clean the terminals using a wire brush and baking soda solution.
This helps to remove the buildup and restore conductivity. After cleaning, apply a dielectric grease to the terminals to prevent future corrosion. This grease protects the metal from moisture and oxygen, the primary culprits in corrosion formation. Remember to always disconnect the battery before performing any maintenance.
Replacing a Faulty Battery Switch
If your battery switch is beyond repair, replacing it is necessary. This process requires some basic electrical knowledge and careful attention to safety. Always disconnect the battery’s negative terminal before beginning any work. Gather your tools: a screwdriver (likely Phillips head), wire cutters/strippers, a wrench (size will depend on your switch’s mounting), and your new battery switch.
The exact procedure will vary slightly depending on the type of switch, but generally involves removing the old switch’s mounting screws or nuts, disconnecting the wires, and installing the new switch in reverse order. When connecting wires, ensure a tight connection to avoid poor conductivity and potential overheating. After installation, reconnect the battery’s negative terminal and test the switch to verify functionality.
Always refer to the manufacturer’s instructions for your specific switch model.
Types of Battery Switches
Several types of battery switches are available for travel trailers. The most common are the standard rotary switches, offering a simple on/off functionality for each battery bank. These are usually affordable and easy to install. Then there are more advanced switches with multiple banks and more complex switching options. Some offer the ability to combine battery banks, others provide features like remote control or monitoring.
Some higher-end models incorporate circuit breakers for added safety, automatically disconnecting the circuit in case of an overload. Consider your needs and budget when selecting a replacement switch. A larger travel trailer with multiple batteries might benefit from a more advanced switch offering more control and safety features. A smaller trailer might only need a simple rotary switch.
Mastering your travel trailer’s battery switch is a vital skill for any RVer. By understanding its function, properly connecting your batteries, and knowing how to troubleshoot common issues, you’ll ensure a smooth and enjoyable camping experience. Remember to always prioritize safety and consult a professional if you’re unsure about any aspect of your electrical system. Happy travels!
Question Bank
What happens if I leave my battery switch on all the time?
Leaving your battery switch on constantly can drain your batteries, especially if you have parasitic draws from devices left on in your RV. It’s best to turn it off when not using the trailer for extended periods.
How do I know which battery is which in a dual battery system?
Usually, one battery is designated for house functions and the other for starting the tow vehicle. Check your RV’s wiring diagram or consult your owner’s manual to identify each battery’s purpose. They may also be labeled.
My battery switch is stuck. What should I do?
Try using a penetrating lubricant on the switch mechanism. If that doesn’t work, you may need to replace the switch. Consult a professional if you are uncomfortable working with electrical systems.
Can I use a different type of battery switch than what came with my trailer?
While you can often replace a battery switch with a similar model, it’s important to ensure the new switch has the correct amperage rating and is compatible with your RV’s electrical system. Check with an RV specialist to ensure compatibility.
